30 October 2019

The Massacre at Penshurst flats

Catching up on my blogging about some great games in the last month - this was an excellent club night skirmish battle, set in the Blackhawk war of 1832.(https://en.wikipedia.org/wiki/Black_Hawk_War)
The wonderful table - a real treat to play on

Settlers hoping for some protection from the unruly natives
Club mate Mac was my opponent and supplier of all the lovely terrain bar a few trees from my collection. My Raiding Blackhawks were drawn from my collection of FIW native americans.  Rules were Rebels and Patriots - my second time using these rules. I find them very intuitive if you are familiar with the "Rampant" series.

The Militia enter the field of battle in column as the Sauk infiltrate through the woods

The Scenario was that Captain Walker’s company of the Illinois Militia were to advance and cross the area, covered by some friendly Dakota Indians. The mission was to protect the local settlers from the marauding savages.  The attacking Sauk Indians, 
led by Sachem “Skwa prefers his dogs”, were after the scalps of the white men stealing their lands.
My second war party used their good mobility in the woods to get the drop on the mounted advance party

The action heating up

The Sharpshooter  and rifles upgrades let my Sauks accurately fire from outside the Militia's range


The Locals take cover behind a barricade but the bloodthirsty Sauk were keen to blood their tomahawks
The Militia were ambushed by Sauk Indians, who I tried to keep mobile throughout to frustrate Mac's efforts to bring massed fire upon me.  In the end the Militia were wiped out, the Sauk Indians retreating only because they could carry no more scalps. Mac was a fantastic sport who rolled an unlikely number of 1s and 2s while my own Indians seemed to have magic bullets that never missed. Nevertheless it was a lovely looking game and I wanted to share the great eye candy.

28 October 2019

Back to Battlegroup Tobruk

I got to get my AHPC IX Oasis out on the table for the first time also!
A great return to Battlegroup after far too long yesterday, playing the second campaign scenario from the rulebook.

Slowpainter John's Italians had triumphed in the first scenario and my DAK now joined him as allies to face off against Alan's British in a desert meeting engagement.  It was a chance to field the DAK Pz IIIs and IV that I finished at the start of the year during AHPC IX.
John's "Eye-ties" move down into the wadi - these light tanks proved very resilient and fierce fighters! 
Alan's left wing moves forward!
The Matildas would indeed prove to be Queen of the Desert this day
Move to contact! My Panzers taking the right flank

But not for long - this after a single salvo from Alan. Well it was their first battle after all I guess!
But my PzIV quickly struck back with its 75mm, taking out a Matilda. it proved to be my only success for the day though

AP fire intensifies, with losses on both sides
 We called it on time, with the British ahead of BR remaining so we called it an allied tactical Victory.  A great game which reminded me why I like the Battlegroup system so much.

25 October 2019

Slaughter on Clapgate Commons

Introduction - This scenario was built as a large, multi-player (8) game with a few twists. I ran it for my club mates in January using the Dragon Rampant rules (see https://tasmancave.blogspot.com/2019/02/january-gaming-cancon.html).  It was a great day with lots of chaos and mayhem! This is the scenario:

Background
Last fighting season the Mallardian army, fresh from its successes over the Spring, besieged the Hopsland border city of Haresburg.  While parts of the city were raised and sacked, the invaders were finally ejected from the walled city and both sides regrouped over winter. When the snows melted the Mallardians attacked from their captured territories, only to find found a renewed Hoplandian force arrayed for battle before them on Clapgate Common.  Would the defenders break through and take the city this time? Or will the Rabbit Army successfully defend its ground and shift onto the offensive…

Umpire Notes: The use of an Umpire, at least for the first half of this game, was found to be essential.  I really pushed the envelope of multiplayer gaming with this scenario, enabled by the simplicity of DR’s tactical rules, and it became a little overwhelming at times. I was also going to add some weather effects and was glad I did not.

Units: As part of their greater Army, each player has a 30 point force under their command, and will be allocated a battle position on the day by their CinC. Players wearing a Fez or Hawai’ian short earn an additional 1 point (for each).  Each player must designate one of their units as their Sub-General.

Army Generals are represented with an additional elite foot or cavalry bodyguard unit, attached to the CinC Player’s force and in addition to their 30 (or 31, or 32) points.

Each Army also has a Reserve Units of 30 points held offboard at game start (see the Reserves Special Rule) and controlled by the CinC

The Combatants:
Mallardian Army of One True Duck – 4 Players (1 designated as CinC)
Hopslandian Scions of the White Rabbit – 4 Players (1 designated as CinC)

Deployment:
Table size: 12 x 6 (adjust to suit)
Scout and Light Cavalry units: start the game 12 inches onto the table
Some sectors will have special rules for the terrain, such as hidden deployment (Umpire discretion)

Umpire Notes: Each 'sector' of the table had a special terrain feature to focus the two opposing players.  Both players were told that some area looked 'interesting' - once a unit got to that location they had to activate it (as a move action) to find out what it was.  This varied between areas - the Cemetery made it easier to resurrect undead (or harder if the opponent held it), a building turned out to have a stash of weapons which upgraded a single unit etc.  This worked well in general but was another layer of complexity.

Multiplayer Rules – players will generally fight against their opposite number across the table, but must stop once both players have completed their turns to keep in synch with the other players (though feel free to attack other enemy units at your convenience of course).  This coordination will be important to the wider battle and the umpire will coordinate.

Victory Conditions:
Uncontested control of a table area: 15 points
Destruction of an enemy force: 30 points
Killed Enemy CinC: 20 points
Killed Enemy Sub-General: 10 points
Key Objectives: as designated

Special Rule: Reserves.
Each Army has a Reserve force of 30 points which starts off the table on Turn 1, and behind one of the players’ armies on the table, at the CinC’s choice.  The Reserves cannot enter the table until after Turn 5, but can shift laterally as they await their chance for glory. Once all Sub Generals have finished their turn, the CinC can either leave the Reserve in place or try to move it.  To do so, the CinC must successfully roll to activate the Reserve Force’s Sub General unit for a Movement action.  If this is successful, the reserve force can relocate laterally by one player position (ie if it was loitering behind the second player it can move to be behind the first or third player, but not the fourth).  This moves all units in the Reserve together - as it is easier to have units obey when not engaged with the enemy and in march order.

From the end of Turn 5 the CinC may choose to either leave the Reserve where it is, move it as usual or bring it onto the field from its current location.  The mechanism to bring the Reserve onto the table is the same as moving it, and if successful, it will begin entering from the table edge in the next turn.

Umpire Note: Assigning this force to a player who had fared badly in the first few turns of the battle was a good way of keeping them involved in the game.

Special Rule: Possible Turncoat!
Intrigue and treachery are all part of war and both side are playing for keeps. Spies and envoys are everywhere, currying favour and coaxing some to switch sides with the promise of riches and women with huge tracts of land.  Will the foe before you see the error of his ways become your friend? Or will the comrade guarding your flank turn and stab you in the back…

At the end of the second turn players will randomly select a chit from a bag or cup – in it there will be two ‘Loyal’ chits per player and a single ‘Traitor’ token.  Keep your result secret! The traitor, if there is one, can declare any time he chooses and must do so by the end of his Turn 5. After announcing, he immediately takes another turn, fighting for the other side – the benefit of surprise and treachery. The betrayed force immediately gains 25VPs for the infamy and notoriety of the enemy.

Umpire’s Note: I took inspiration for this special rule from a Warhammer Scenario in the General’s Compendium – it generated an appropriate amount of mayhem and chaos!


Overall, I was pleased by the way this big game scenario worked, having done a bit of work to ensure that all players were kept engaged and busy throughout. In the CinC role think we found the limit of what one player can comfortably manage and I would suggest that perhaps keeping the CinC as a seperate player, in charge of the Army reserve, would be useful - and allow you to expand to a 10 player game.  In the end, everyone got a lot of toys on the table, lots of dice were rolled and it was a fun and noisy environment filled with laughs: the best kind of gaming.

23 October 2019

Napoleonic Peninsula War Campaign: Part 1

Over the last month, John and Gav at the club have been playing a Napoleonic campaign in the early years of the Peninsula War in Spain. To add to the fog of war I volunteered to moderate for them and deliver them the results of their blind map moves to help build a campaign narrative.

We have been using Sharpe Practice and the Dawns and Departures campaign supplement, which we enjoy and they have worked extremely well.  The campaign context has been late in the campaigning season with the French collecting fodder and supplies from the recent harvest, in order to prepare for winter cantonment. The British, along with their Spanish guerrilla allies, mean to stop them.

Prelude
The French Commander (Gav) went with a more numerous force of average and some lesser quality troops - this would allow him to occupy (and plunder) a number of Spanish villages and "acquire" the supplies he needs. The British (John) took a smaller but high quality Regular force, supported by the guerrillas, so he could strike hard. It was an interesting matchup and there were 3 days of map moves  in which I really played out some fog of war, vague scouting reports and the like - all adding to a sense of tension, before the battle was joined.

The British went on the offensive and pushed north to find the French main body, with a flank security force of light troops on their west flank towards indication of a smaller French force in that direction. This second French force was larger than expected, comprising of Voltigeurs and Dragoons was indeed moving in their direction but without expectation of contact. This resulting engagement was played out on a club night and as expected the British Riflemen and light bobs fells back before the stronger French, but giving the British Commander warning of what was coming.  The scene was set for a nice big weekend game.
The Commanders gather to do battle at Gav's Palace of Gaming - French would enter from the left on the flank of the British marching down the table
Flank Attack
The first big game was the contact of the French recon force hitting the flank of the British main column. They hoped to sack the baggage and do some damage while hoping for reinforcements from the French Main force, now alerted via dispatch rider, and thus catch the British from 2 directions.  The British commander hoped to repel this flank attack, crush it in isolation and then turn back to the main force to defeat it in detail.  Note that neither commander knew the exact size or composition of the enemy at this stage.
The British in march column 
John's newly painted Light Dragoons, under the command of young Lieutenant Overbight, scout ahead and on the flanks
The French advance from the left and the forewarned British deploy from the road to meet them
The British Regulars move forward into the French fire, undeterred by casualties from enemy fire
Musketry exchanged both at the farmhouse and in the vineyard (not shown)
About to be overwhelmed, the French light troops start to fall back from the farm, just as the Dragoons start to move in...
On the Northern edge of the Battlefield, French reinforcements begin to arrive - but are they in time to make a difference?
The French light troops deliver defensive fire into the Dragoons, but the cavalrymens' blood was up... 


And in 2 turns it was over. This French unit was cut down by galloping sabres and the remainder sensibly retired to the west.
A most enjoyable and thematic battle with some masterful handling of the Cavalry by John. The French reinforcement arrived too late to swing the odds, but the scene was now set for a major engagement in the afternoon. The French Commander, now aware of the location and disposition of the British, was bringing his main force to bear and while his reinforcement had arrived too late for this battle, they seized the key terrain to support the guns and infantry of the main force.

The afternoon would be hotly contested indeed...

19 October 2019

Making a Wargames mat

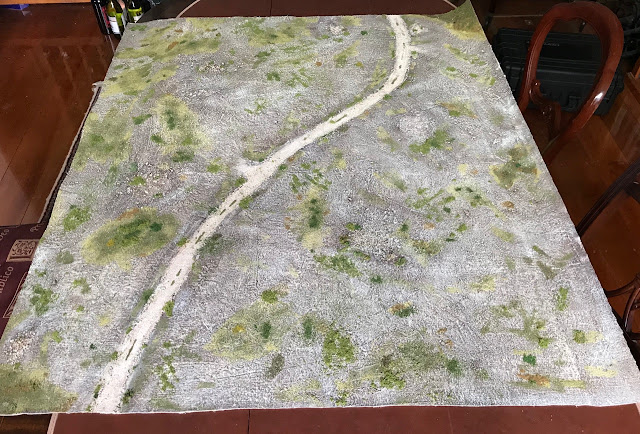
I wasn't happy with my array of gaming mats for use with Mortal Gods - they are all too woody, green and more like Northern Europe.  So I decided to experiment and try making my own. The parameters were to be: looks Mediterranean and is easily portable for use on club nights.
The finished product - WIP pics below
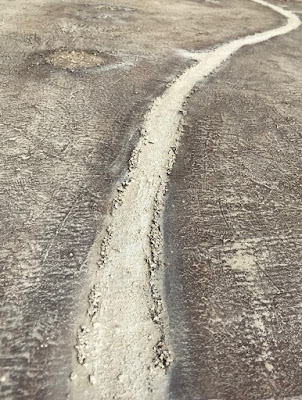
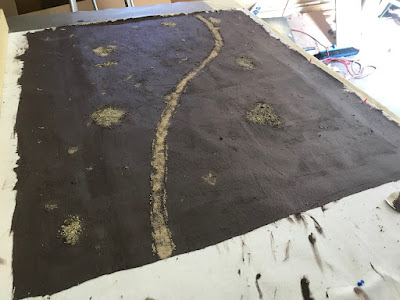
I went with a 3 x 4 size, using a cotton based material as a base which was pinned into place with drawing pins (to stop curling) with a few feet extra on each side.  The first step was to make the base layer using caulk which I scraped thinly (with a strip of mdf) across the whole surface. Once this was done a few small patches of gravel were made, as was a small track sized road from one side to the other - I used some ballast as the road surface and some kitty litter along the edges. These were all pressed into the soft caulk and left to dry overnight.

I chose a dark coffee coloured caulk to use, so it would be a good base colour
The next day another, thinner, layer of caulk was applied - as it dried and got tacky, I applied a range of cloths and material to try and raise areas and provide a rough surface that would be suitable for drybrushing. In this way I would avoid having to use sand or other materials which are both abrasive to figures and which are prone to falling off when the mat is rolled.  Once dry, I started drybrushing and mat began to take shape.

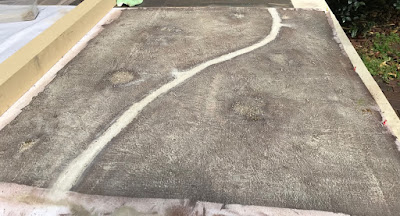
First drybrushing layer was a Tamiya Earth colour, followed by lighter cremes

After three layers of deliberately uneven drybrushing

Detail of the road
After giving the paint an hour to dry I began flocking, initially using yellow, light green and brown and a little bit of clump foliage


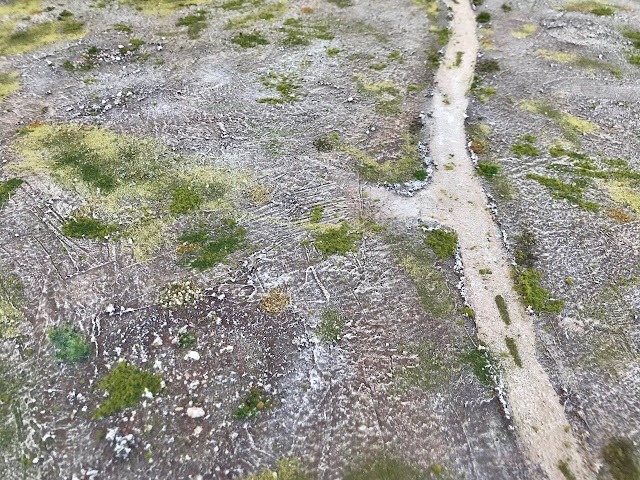
In going for a drier climate look, the darker/green colours are at the centre, surrounded by the lighter patches where the vegetation is struggling.
Trying out with some olive trees


The mat was then left for a week to thoroughly dry (I was travelling interstate), slightly lightening in colour as it did.  I then did another layer of drybrushing, including a little over the patches of flock to help blend them in.  I then started adding some Woodlands light green and medium green coarse turf in a blended fashion.  This added in additional texture, as well as helping avoid a spotty look by adding clumps in the areas between large flock patches.

I also applied a thinned out brown artists ink along the road edge to define it better.


With the turf laid down, two light layers of watered down PVA were applied with a spray gun to help seal them in place.

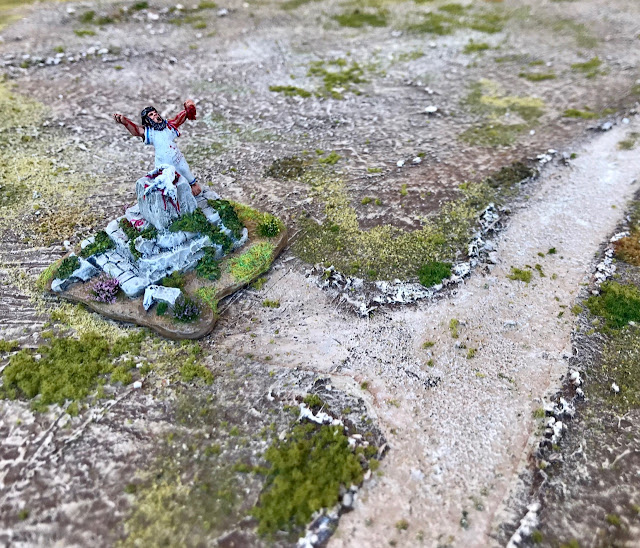
Of course, all Greek themed boards look better with a temple and some Spartans in position (not mine though, unfortunately!)


It was now trimmed down to size using a stanley knife and a long straight edge, and I did some final drybrushing to the road surface and rock edges - ready for battle!
Picking out the road edge and the odd rock in white on the mat really made it pop

Along to road to Corinth...
I'm very happy with the outcome and I picked up some good techniques during this project. Thanks to club mates Mac and Gav for their invaluable assistance and advice along the way (and more than a few of the materials Gav - cheers mate).  Overall materiel costs were similar to buying a commercial product, but I think I have achieved a better outcome and enjoyed myself along the way.